Content Master
Last updated: August 28, 2026
Introduction
What is Content Master?
Content Master is a content engine for JTL-based online shops and marketplaces — for every sales channel connected to your Wawi. It takes the product data you already maintain in JTL-Wawi — titles, attributes, custom fields — and turns it into complete, well-written product content: descriptions, marketplace attributes and listings, and translations.
You don’t copy anything into external tools, and you don’t write texts product by product. Content Master syncs directly with your Wawi, generates content for entire product ranges at once, and sends the finished results straight back to your shop or marketplace — one product, many channels, one workflow.
Everything runs in your browser. There is nothing to install on your server, and your original Wawi data is never overwritten without your approval.
Which problems does Content Master solve?
Writing product texts takes too much time. Most shops have more products than anyone can describe by hand. New items arrive faster than the team can write, and the backlog grows. Content Master generates texts for hundreds of products in one run — based on your real product data, not on guesswork.
Manufacturer texts hurt your visibility. When a hundred shops use the same manufacturer description, search engines have no reason to rank yours. Content Master writes unique texts from your own data, so every product page is one of a kind.
Marketplace attributes are a job of their own. Amazon, Kaufland, and Otto each come with their own category tree and their own set of mandatory, recommended, and optional attributes — and they keep changing. Content Master generates and maintains them for you: it detects the right category for each product, fills in the channel and category attributes the marketplace expects, reuses the default values already stored in your Wawi, and keeps the marketplace metadata up to date. This is the heart of Content Master.
Marketplaces reject incomplete listings. A single missing mandatory field means a rejected offer. Content Master checks every listing for completeness before it goes out — an incomplete listing never reaches the marketplace.
Expanding abroad means translating everything. A new market usually means weeks of translation work: descriptions, titles, attributes. With Content Master, you approve your content once and translate it into your target languages in a single run.
Automated content feels risky. We get it — handing your catalog to an automated system takes trust. That’s why nothing goes live without your review. Drafts, a full version history, and field-level rollback mean you are always in control, and your original Wawi data always stays safe.
Key features
- Direct JTL-Wawi sync — your products, attributes, and custom fields are pulled into a secure workspace. The original data is read-only until you decide to publish.
- Bulk content generation — titles, short and long descriptions, and bullet points for single products or entire ranges, generated from your actual product data.
- Marketplace attributes — automatic category detection, channel- and category-specific attributes, free choice of which fields to generate.
- Your context comes first — add extra information by text input or file upload. Whatever you provide always takes priority over the base data.
- Channel-aware output — content is generated per channel (JTL-Shop, Amazon, Kaufland), with the platform’s formatting rules and SEO limits applied automatically.
- Translations — once approved, your content can be translated into other European languages, including titles and attributes.
- Review and version control — drafts before publishing, a detailed change history, and one-click rollback for any single field.
- Publish back to Wawi — approved content syncs back to JTL-Wawi and goes live in your shop.
A typical workflow
- Sync — connect your JTL-Wawi. Content Master pulls your products into the workspace. Each product starts with the status New.
- Select — pick a product or a whole batch, choose the channel (for example JTL-Shop or Amazon) and, if needed, the target language.
- Generate — let Content Master create titles, descriptions, and attributes. Add your own context or upload a file if you want to steer the result — your input always wins.
- Review — read the generated content next to your original data. Regenerate single fields, edit manually, or roll back to an earlier version.
- Publish — click Apply to Wawi. The approved content syncs back to your JTL-Wawi and appears in your shop.
That’s the whole loop: sync, select, generate, review, publish. Your first 20 products are free, so you can try the full workflow before deciding anything.
Requirements
- Seller2Go account,
- Content Master licence,
- connected JTL-Wawi,
- two-factor authentication,
- internet connection.
Installation
Create account → enable 2FA → connect JTL-Wawi → activate licence → open Content Master.
Create account
First, open the Seller2Go website. Click “Sign Up” in the top-right corner to create a new account

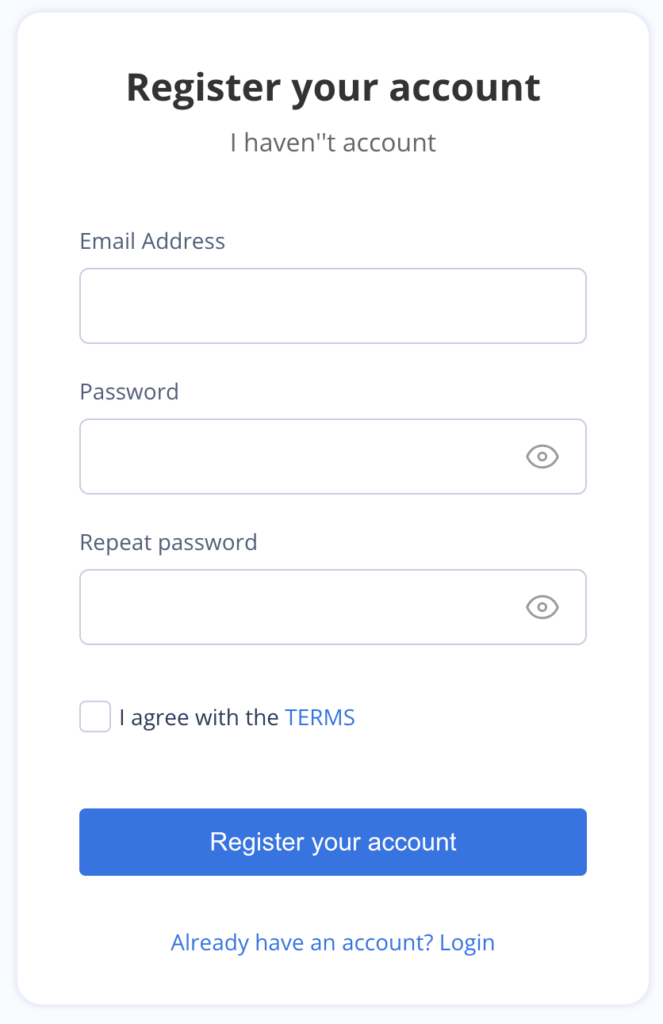
Enter the required login details in the registration form.
Enter the following information:
- Email address
- Password
- Repeat password
Then tick the checkbox to accept the Terms and Conditions and click “Register account”
✓ Note:Make sure both passwords are identical
✓ Note:Use a strong password whenever possible, including uppercase and lowercase letters, numbers, and special characters
Confirm Your Email Address
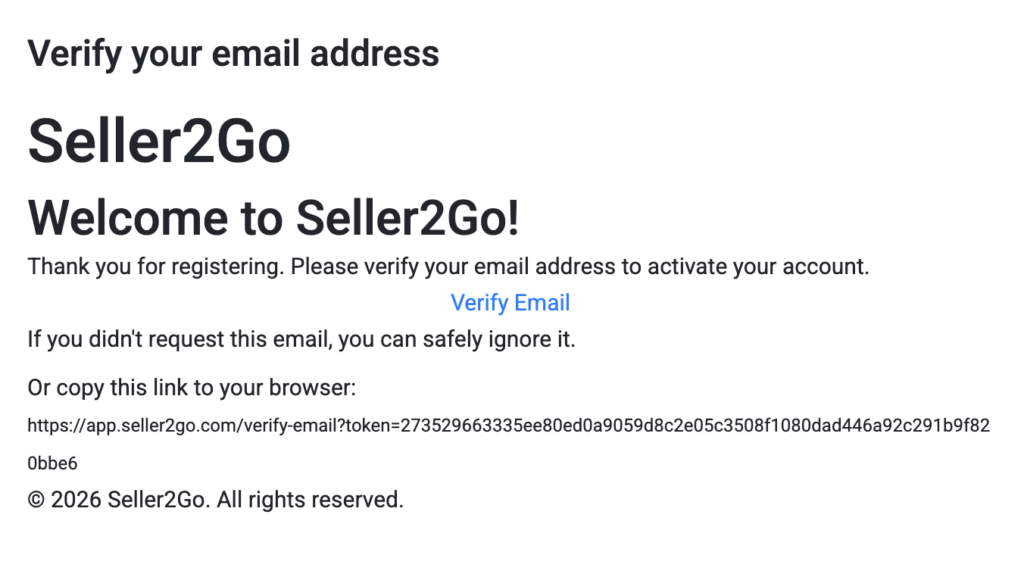
After registration, you will receive an email at the address you provided. Open this message and confirm your email address using the confirmation link included in the email.
How to proceed:
- Open your email inbox.
- Look for the confirmation email from Seller2Go.
- Open the email.
- Click the confirmation link.
Your registration is only fully completed after this confirmation step.
✓Note:Also check your spam or junk folder if the email does not appear in your inbox right away.
✓ Important:Without confirming your email address, your account may not be fully activated or available for use.
Result
- Your Seller2Go account has been created.
- Your email address has been confirmed.
- You can now log in using your account credentials
My Account Section
After logging in, you will be taken to the “My Account” section. This is where you manage the most important basic settings of your account.
The following tabs are available in this section:
- Profile
- Database Connection
- Security
- Shop Settings
Each of these tabs serves a specific purpose and should be reviewed during the initial setup.
Profile Tab
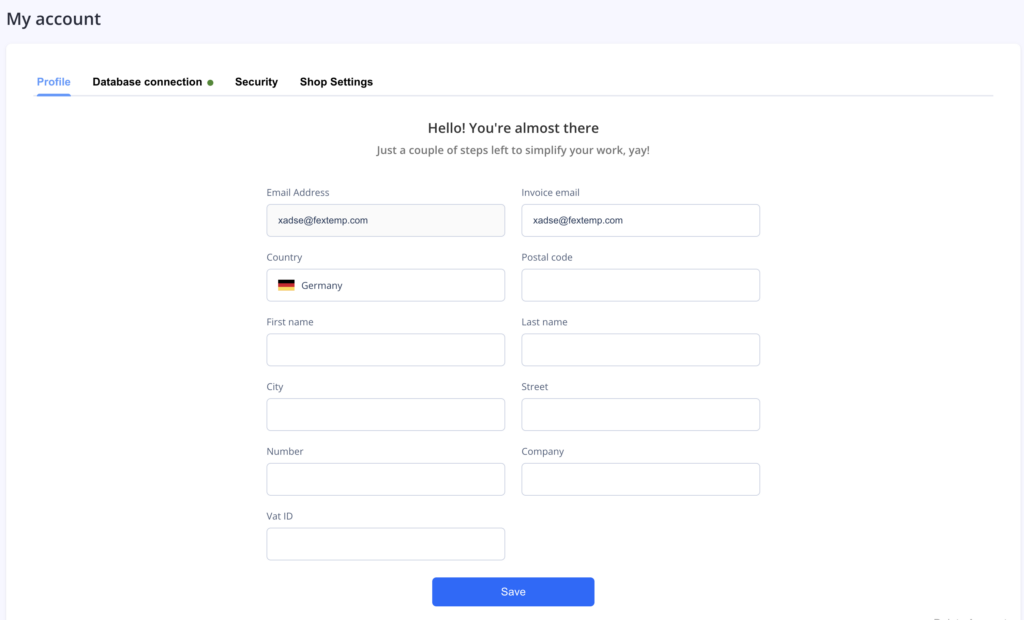
In the “Profile” tab, you can manage your personal and business details.
In this section, you can enter information such as:
- Email address
- Billing email
- Country
- Postal code
- First name
- Last name
- City
- Street
- House number
- Company
- VAT ID
Enter the required information in the relevant fields and then click “Save”.
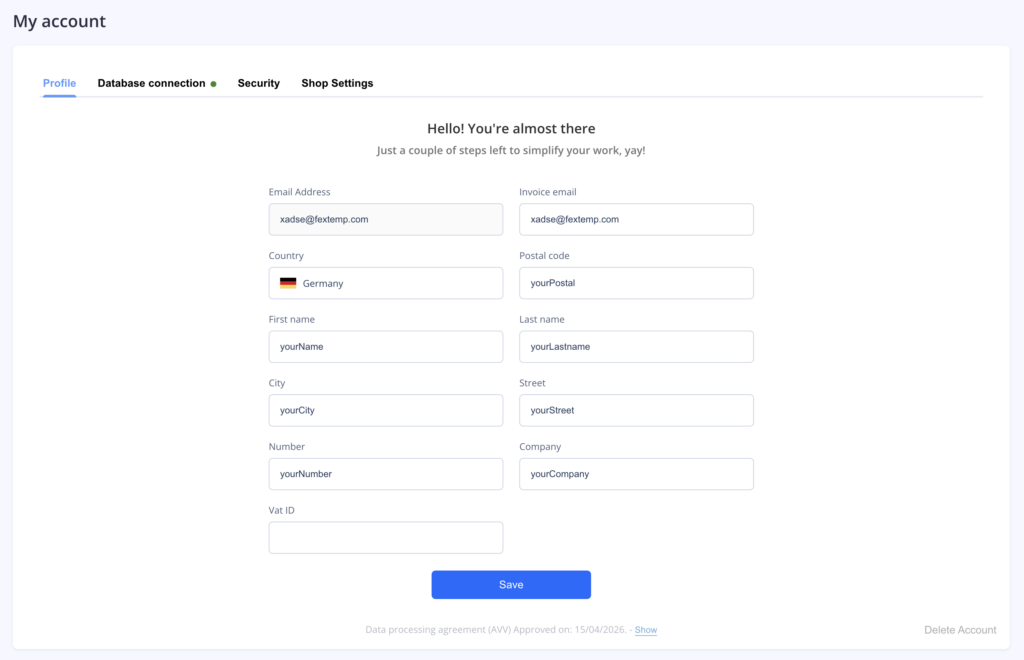
Purpose of this section
The information in your profile is used to:
- clearly identify your account
- store your billing and contact details
- manage your business information in one central place
✓ Note:Please keep your details as complete as possible. Clean and accurate master data makes the system easier to use later and helps avoid unnecessary follow-up questions.
Result
- Your account details are saved in the system.
- Your user account is ready for the next setup steps
Database Connection Tab
In the “Database Connection” tab, you connect Seller2Go to your JTL-Wawi database
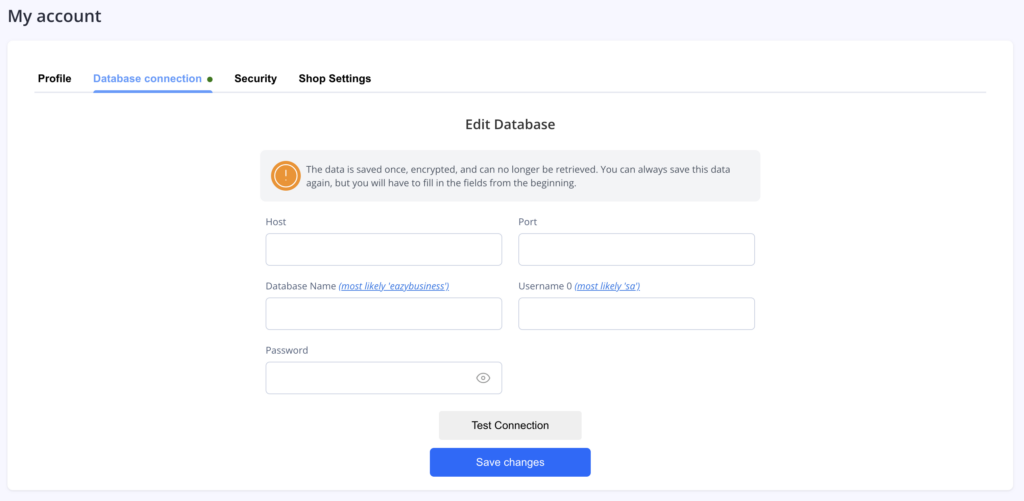
The following details are usually required for the connection:
- Host
- Port
- Database name
- Username
- Password
Enter all details completely.
Then follow these steps:
- Click “Test connection”.
- Wait for the system response.
- If the test is successful, click “Save changes”.
Meaning of the individual fields
- Host
Address of the database server. - Port
Network port used for the database connection. - Database name
Name of the JTL-Wawi database. - Username
Database user with access permissions. - Password
Password for the database user.
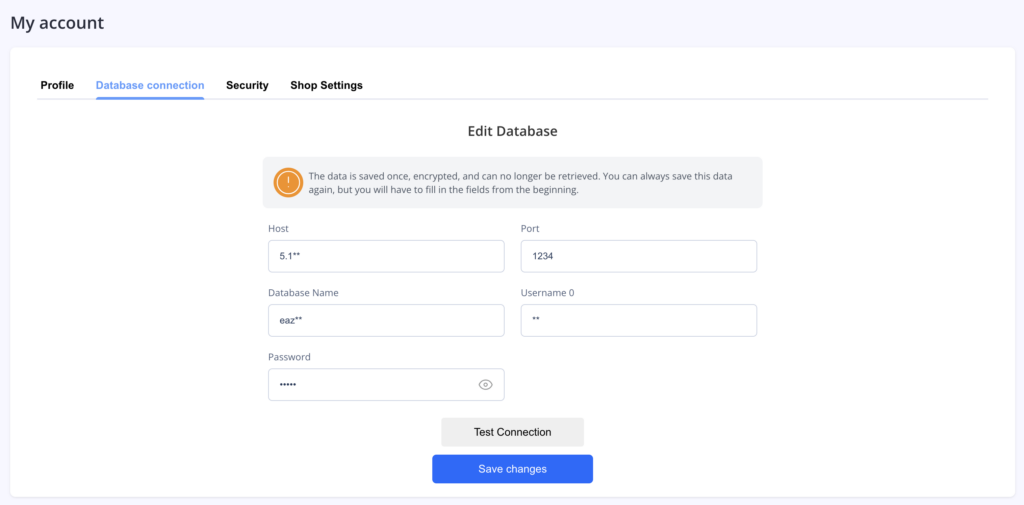
✓ Important:The entered data is saved and encrypted. According to the system notice, it cannot simply be viewed again later. If you want to set up the connection again, you will need to fill in all fields from scratch.
If the connection test fails
Please check the following points in particular:
- Is the host entered correctly?
- Is the port correct?
- Did you use the correct database name?
- Are the username and password correct?
- Is the database server accessible from outside?
- Does the selected user have sufficient permissions?
Result
- Seller2Go is connected to your JTL-Wawi database.
- The connection has been tested successfully and saved.
Security Tab
In the “Security” tab, you can enable two-factor authentication.
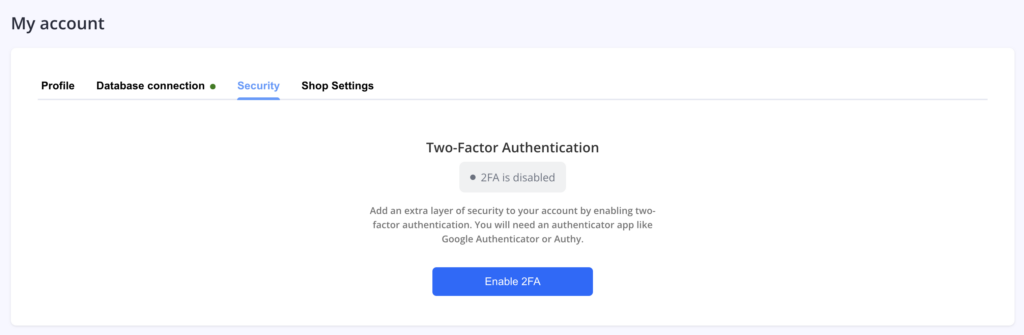
Two-factor authentication significantly increases the security of your account. In addition to your password, you will need a one-time code from an authenticator app when logging in.
How to enable two-factor authentication
- Click “Enable 2FA”.
- Open an authenticator app on your smartphone, for example:
- Google Authenticator
- Authy
- Scan the displayed QR code.
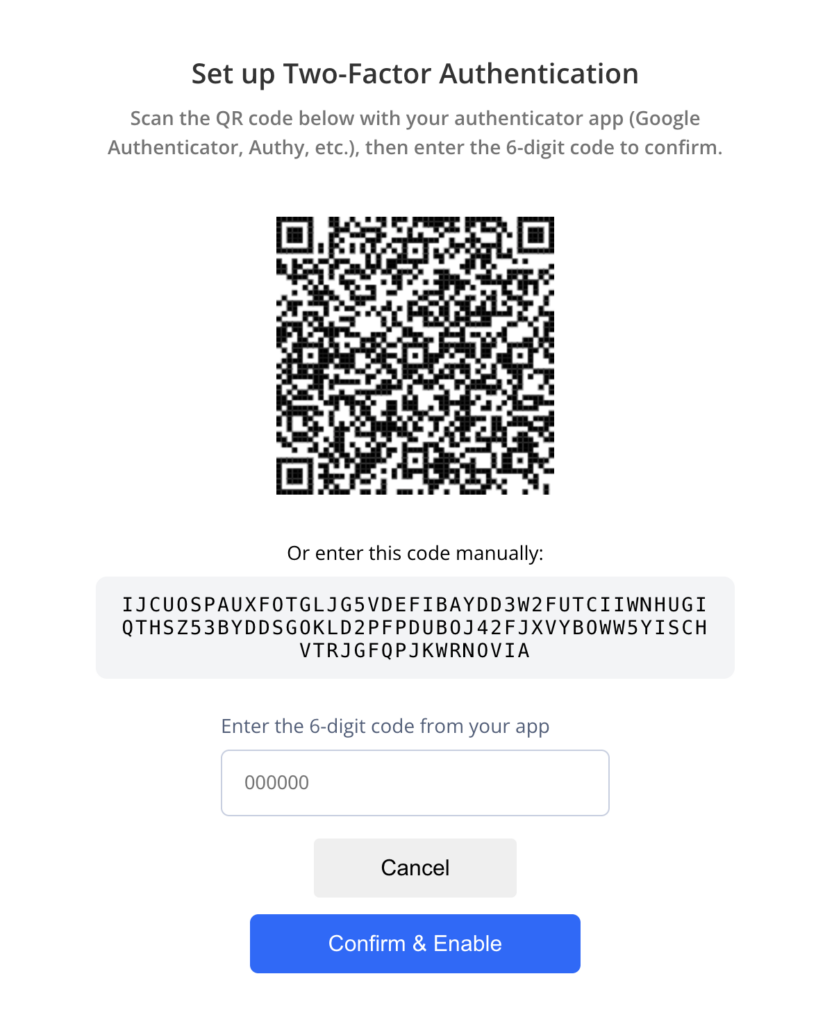
Alternatively, you can enter the displayed setup code manually in the app.
After scanning, your app will generate a six-digit code.
Finally:
- enter the six-digit code in the input field
- click “Confirm & Activate”
If activation is successful, the status will be shown accordingly in the “Security” section.
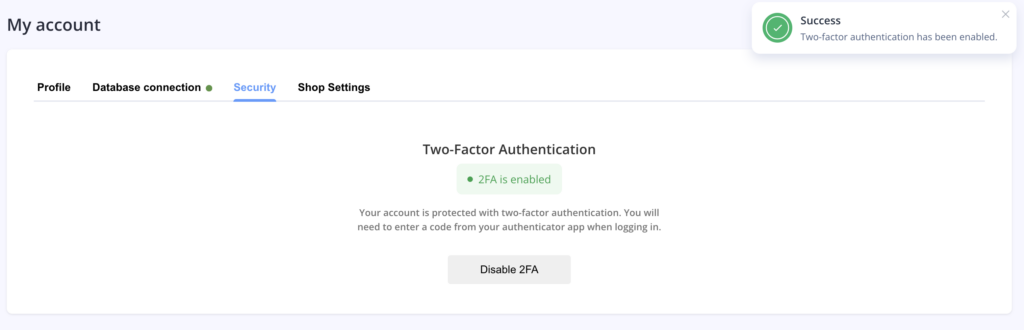
✓Note:From that point on, you will also need the current code from your authenticator app every time you log in.
✓Important:Keep your smartphone safe. Without access to your authenticator app, logging in may become difficult.
Result
- Two-factor authentication is enabled.
- Your account is now protected with an extra layer of security.
Shop Settings Tab
In the “Shop Settings” tab, you can manage notifications and monitoring options for your connected shop.

In the overview, each shop is displayed together with its status, for example “Online”. Click the gear icon to open the detailed configuration.
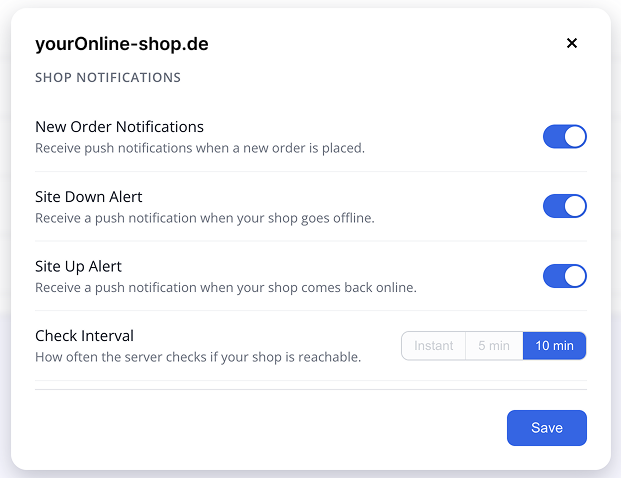
In this section, you can manage options such as:
- New order notifications
- Outage notification
- Recovery notification
You can also define the check interval. This determines how often Seller2Go checks whether your shop is reachable.
Depending on the configuration, the following intervals may be available, for example:
- Instant
- 5 min
- 10 min
After selecting the desired options, click “Save”.
Purpose of this section
With these settings, you define:
- when you receive notifications
- which shop events you are informed about
- how often the availability of the shop is checked
✓ Note:A shorter check interval provides faster notifications, but it is not required in every scenario.
Result
- The selected notifications are enabled.
- Monitoring for your shop has been set up.
Activate licence
Before completing the connection, you may be asked to choose a plan (yearly subscription).
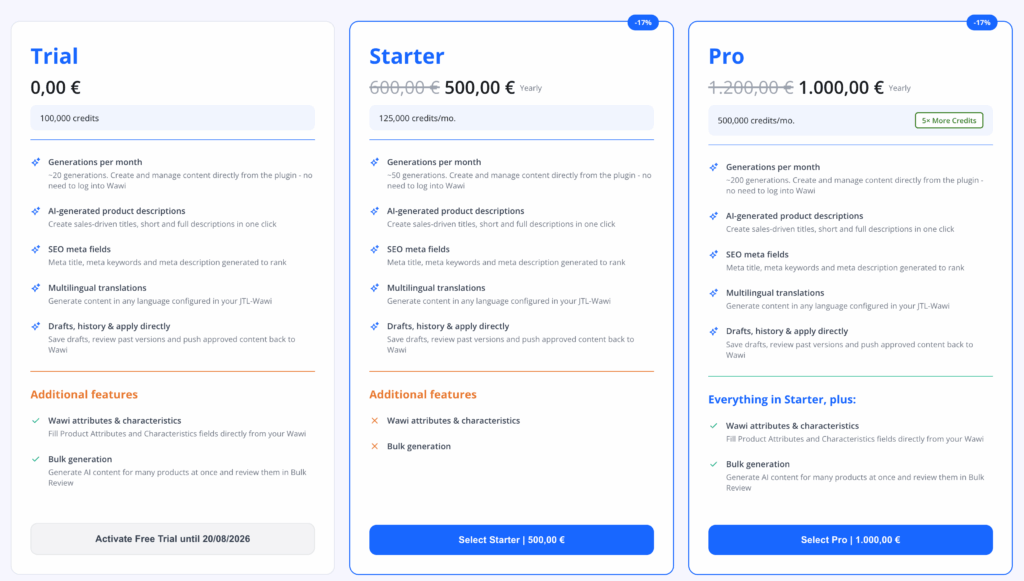
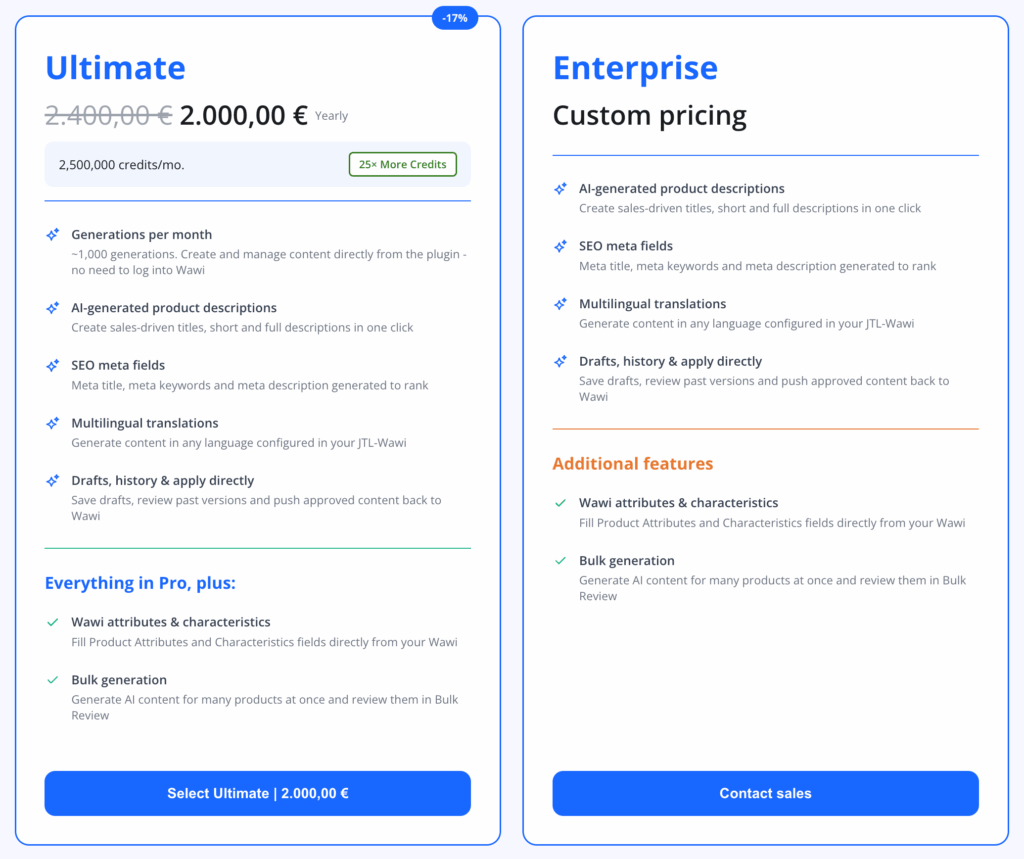
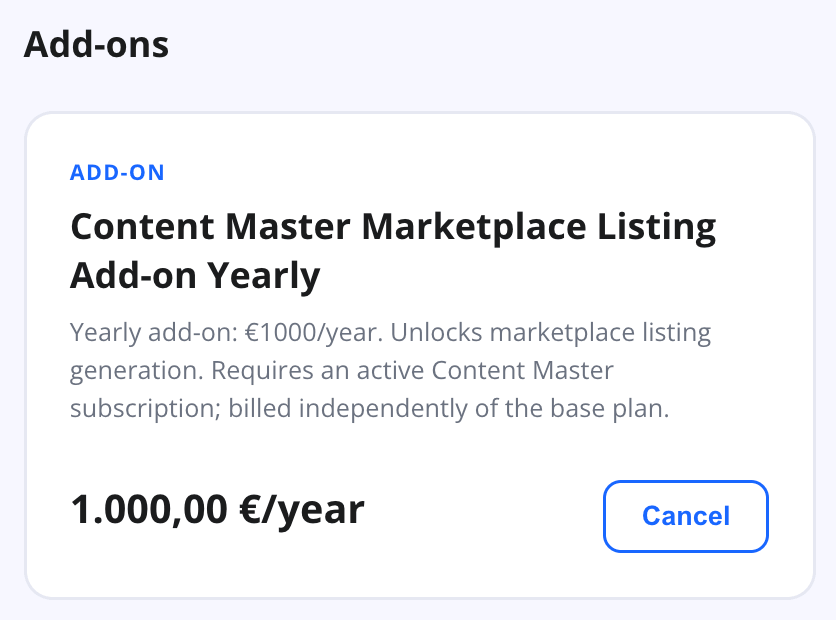
Depending on the plan, the scope and number of available features may vary.
Open Content Master
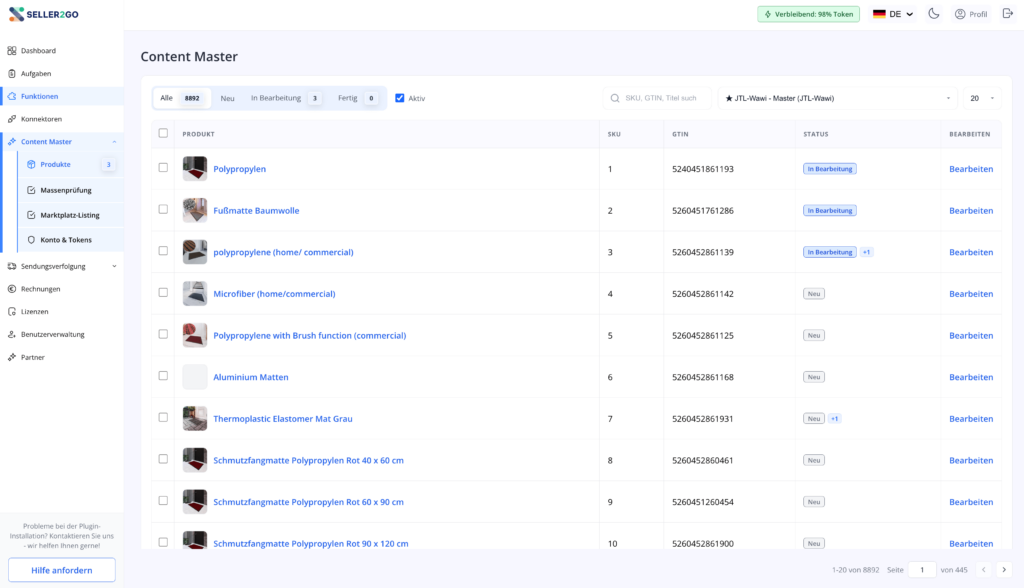
First Product
Open product → generate all fields → review → save draft → apply to Wawi.
Follow this flow once and you’ll know how Content Master works. Nothing is written to JTL-Wawi until you click Apply to Wawi.
Open product
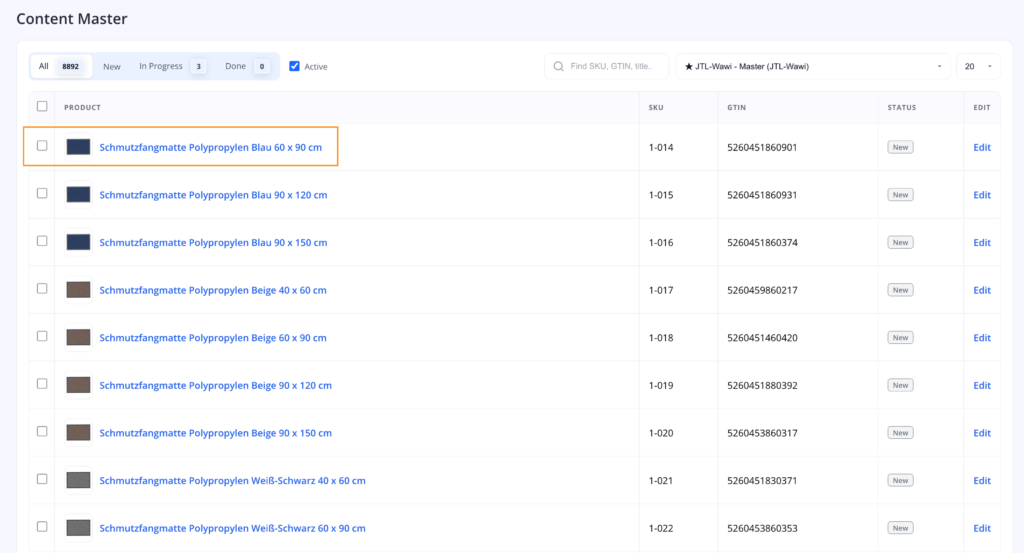
Your products are listed in Content Master, grouped by status:
- All — every product from the selected platform
- New — not touched yet
- In Progress — saved as a draft
- Done — already applied to JTL-Wawi
Use the search field to find a product by SKU, GTIN, or title, and the selector on the right to switch the platform. Keep Active ticked to hide inactive products.
Click a product name — or Edit — to open its card.
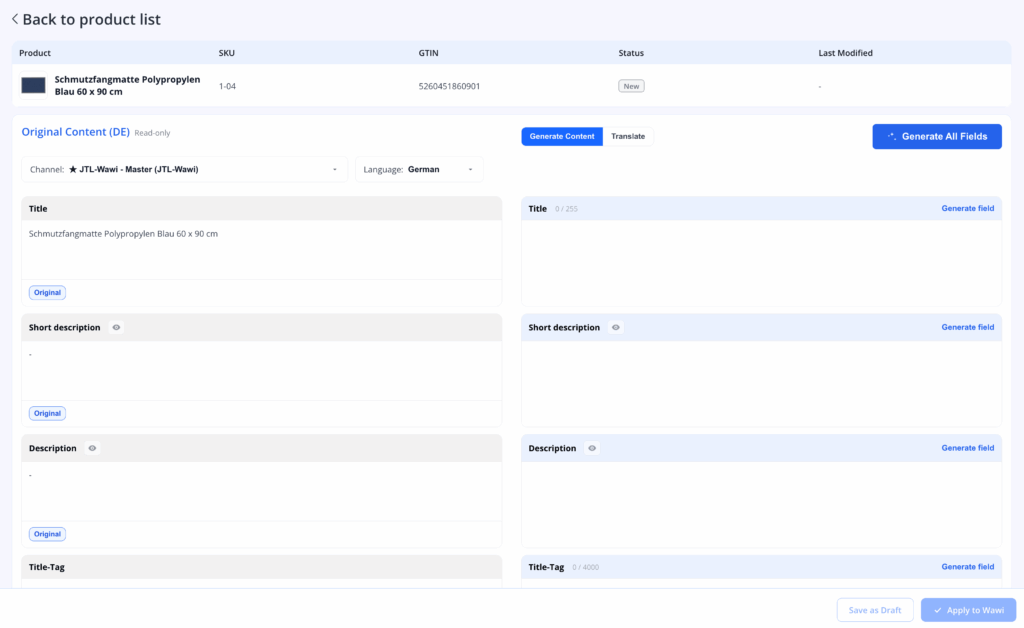
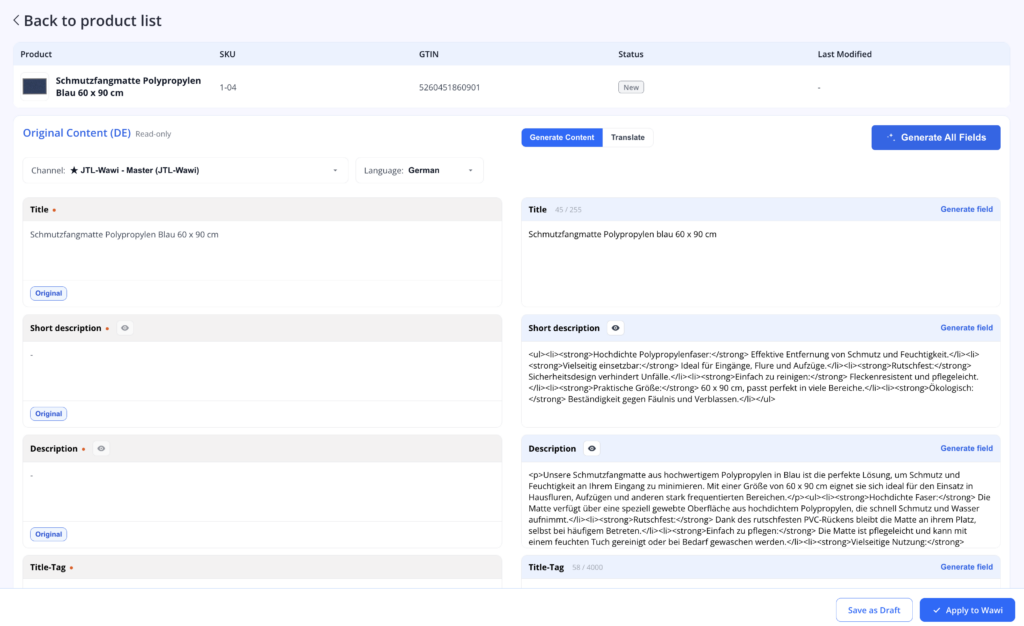
Inside the card, the left column shows Original Content, read-only, exactly as it is stored in JTL-Wawi. Above it you see the Channel and the Language of that content. The right column is where the generated content will appear.
Generate all fields
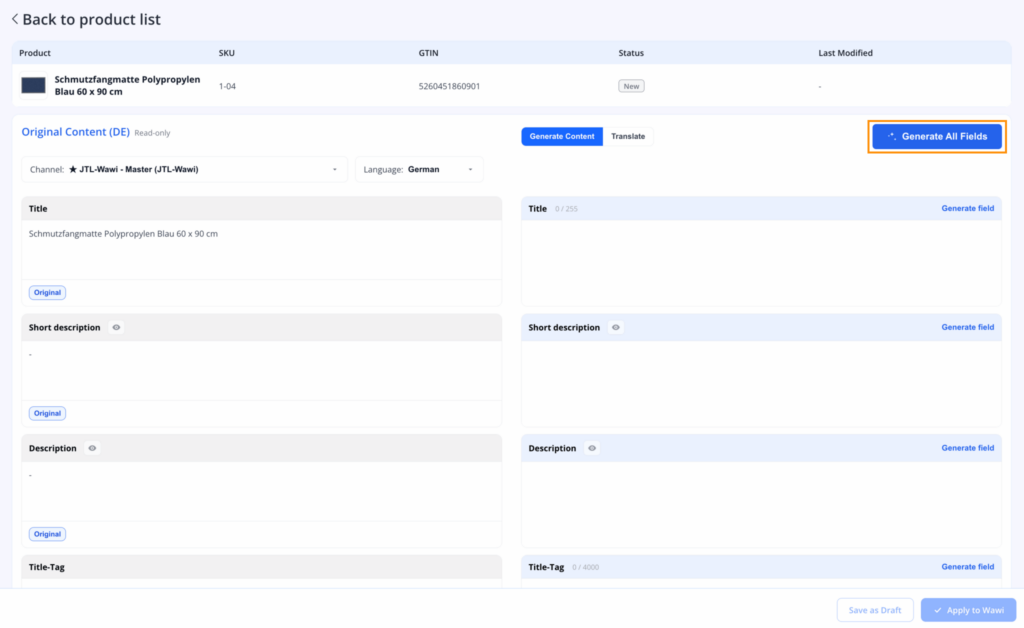
Click Generate All Fields to fill the whole product at once.
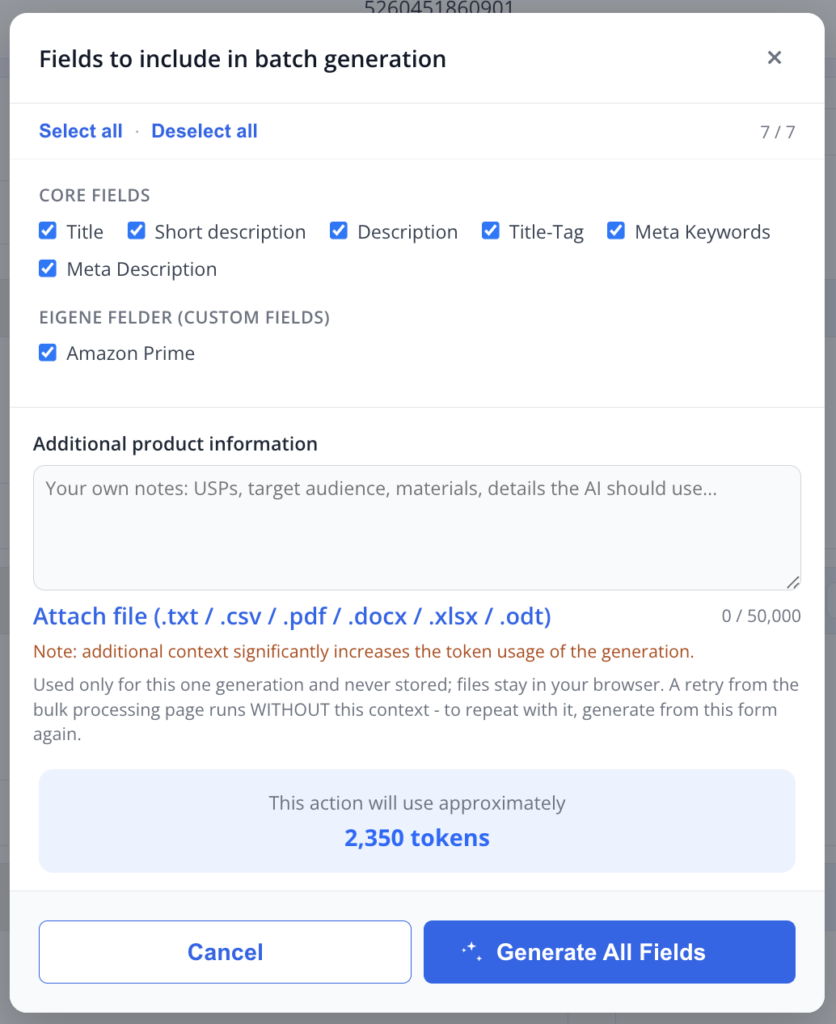
In the dialog you decide what to include:
- Core fields — Title, Short description, Description, Title-Tag, Meta Keywords, Meta Description
- Eigene Felder (custom fields) — your own JTL fields, for example Amazon Prime
Use Select all or Deselect all, or tick fields individually — the counter on the right shows how many are selected.
Additional product information is optional. Add USPs, target audience, materials — anything the AI should take into account — or attach a file (.txt, .csv, .pdf, .docx, .xlsx, .odt). This context is used only for this one generation, is never stored, and files stay in your browser.
✓ Note:
additional context significantly increases token usage. Use it where it really adds value.
To generate a single field instead, use Generate field next to that field.
Review
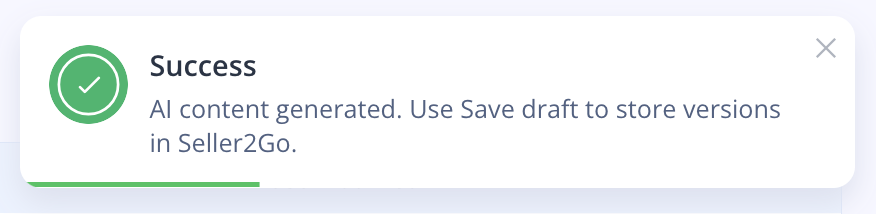
Once the generation finishes, you’ll see the confirmation: AI content generated. Use Save draft to store versions in Seller2Go.
Now compare the two columns: your original on the left, the generated content on the right. A red dot next to a field name marks the fields that received new content. Character counters (for example 45 / 255 for the title) show that the limits are respected.
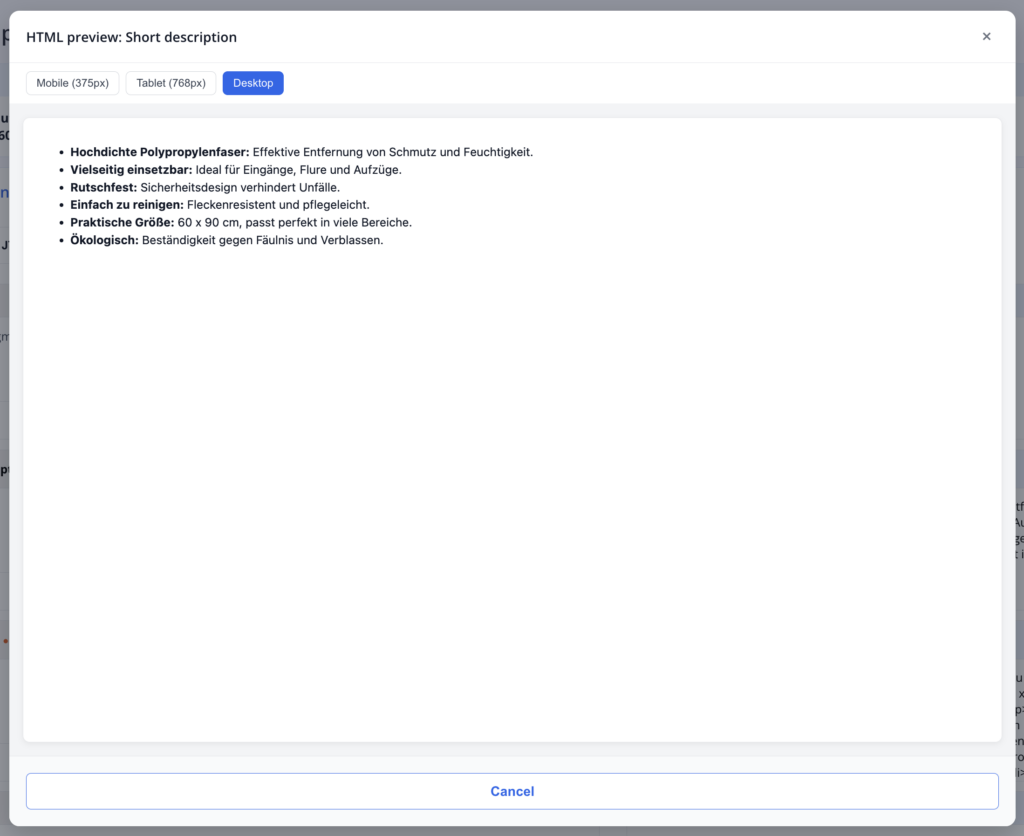
Fields containing HTML have an eye icon — click it to open HTML preview and see how the text will actually look, in Mobile, Tablet, or Desktop width.
If a text doesn’t convince you, click Generate field to generate that one field again. Do manual edits at the very end: generating a field again overwrites whatever you typed by hand.
Save as Draft
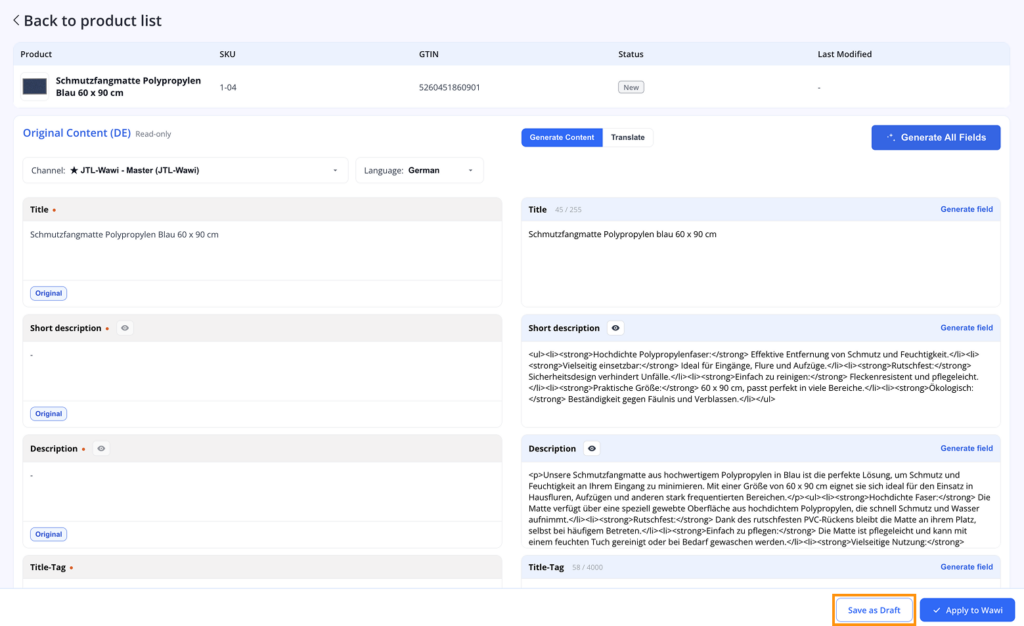
Click Save as Draft if the texts still need to be reviewed by someone else. The product keeps its generated content, moves to the In Progress tab, and nothing is sent to JTL-Wawi yet.
Each save creates a version, so you can always go back to an earlier state.
Apply to Wawi
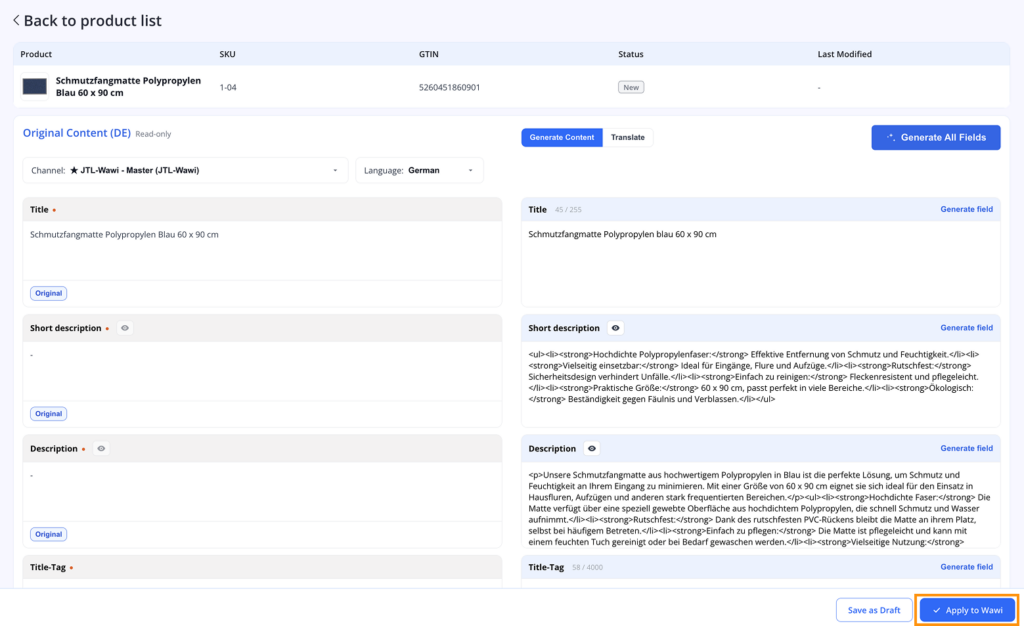
Click Apply to Wawi when the content is ready. The approved fields are written back to JTL-Wawi, appear in your shop, and the product moves to the Done tab.
Translation
Translate a product you’ve already finished — for example from German into English for a marketplace.
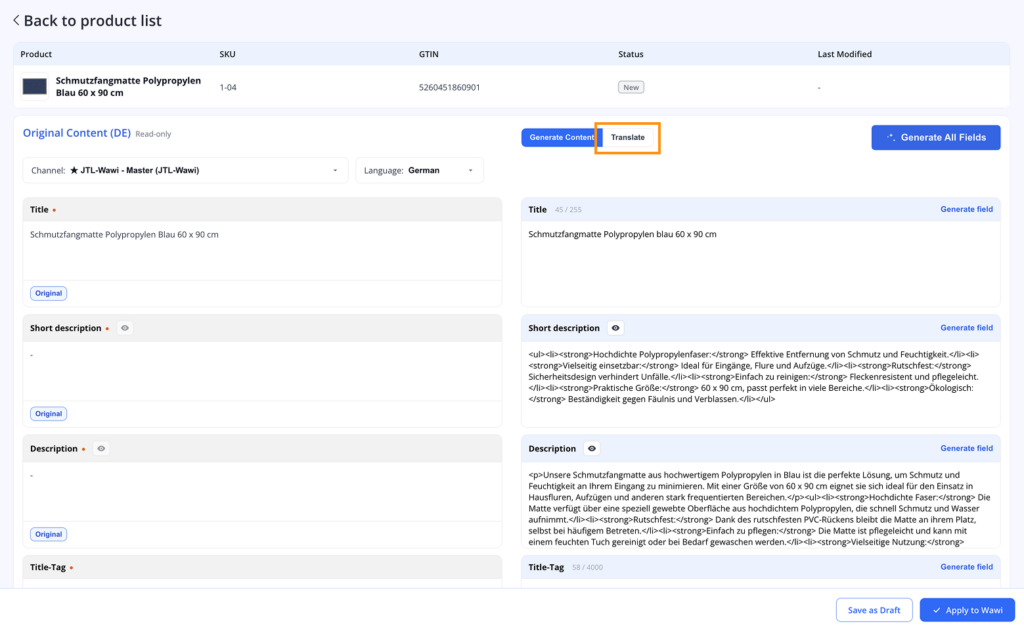
Select translate tab
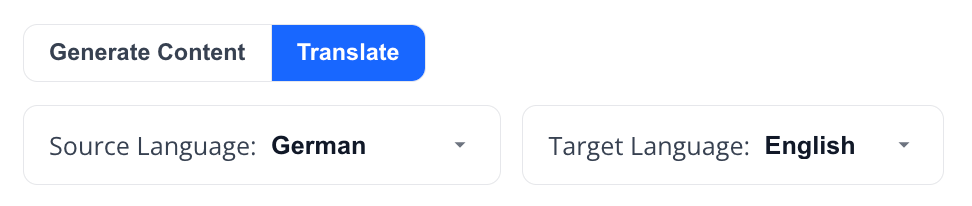
In the product card, switch from Generate Content to Translate. Two selectors appear instead of the generation options: Source Language and Target Language.
Source language
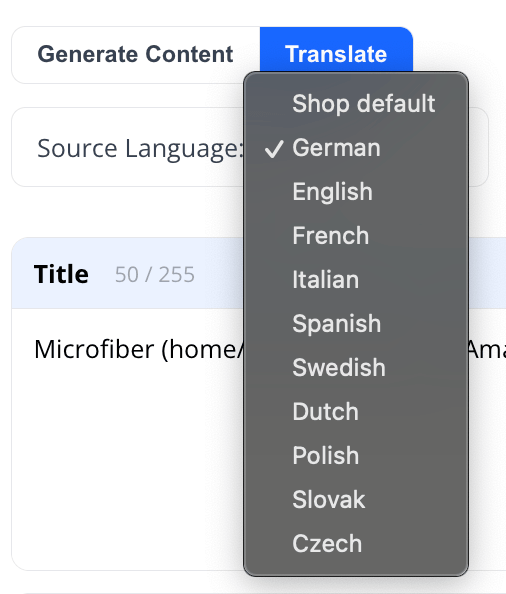
Source Language is the language the text is translated from. It’s detected from your content, and you can change it: choose Shop default or pick a language directly.
Select target language
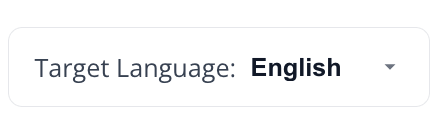
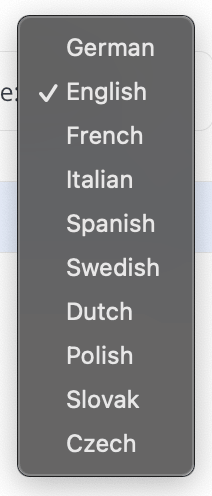
Target Language is the language you translate into. Available languages: German, English, French, Italian, Spanish, Swedish, Dutch, Polish, Slovak, and Czech.
Translate all fields
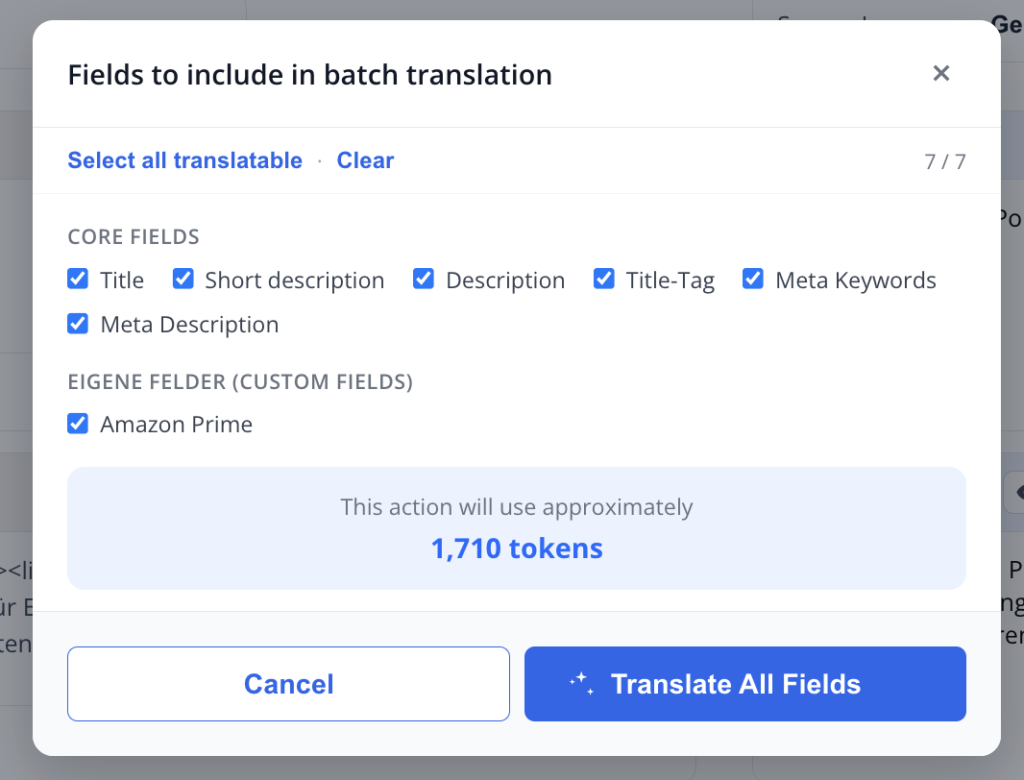
Click Translate All Fields and select which fields to include — the same core fields and custom fields as in generation. Select all translatable ticks everything that can be translated; Clear removes the selection.
Before you start, the dialog shows the estimated token usage for this run, for example approximately 1,710 tokens. Confirm with Translate All Fields or step back with Cancel.
To translate a single field, use Generate field next to it.

Review
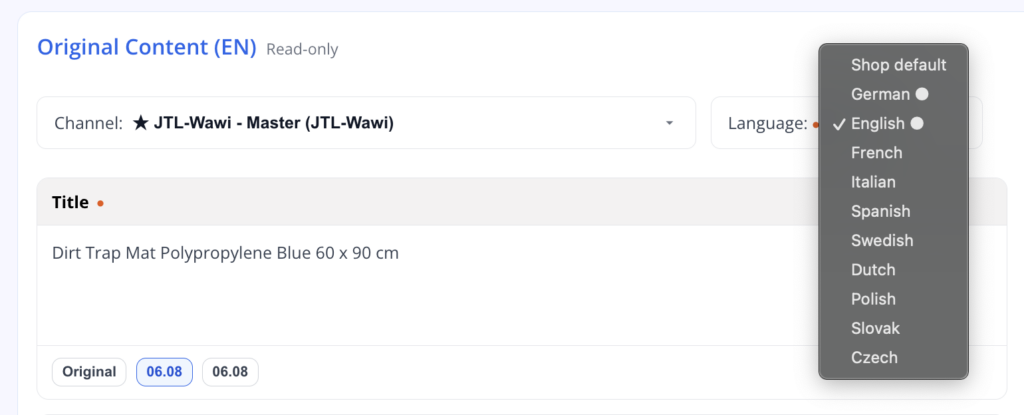
Switch the Language selector at the top of the card to see the translated version — the header changes to Original Content (EN).
In the language list, a dot marks the languages that already have content, so you can see at a glance what’s translated and what isn’t.
Under each field you’ll find its versions: Original plus the dated versions created by generation and translation. Click a version to bring it back.
Finish as usual: Save as Draft for review, or Apply to Wawi to publish the translation.
Apply

Marketplace Listing
Content Master doesn’t just work with your online shop — it works with every sales channel connected to your JTL-Wawi, marketplaces included. The workflow is the one you already know: generate content, review it, apply it to your Wawi.
Marketplace attributes are the heart of Content Master. Every marketplace requires its own set of mandatory attributes — and Content Master doesn’t just fill them in, it maintains them: it detects the right category for each product, generates the channel and category attributes based on the marketplace’s category tree, reuses the default values already stored in your JTL-Wawi, and keeps the marketplace metadata up to date. Before anything goes out, it checks every listing for completeness — so no incomplete offer ever reaches the marketplace.
Select marketplace
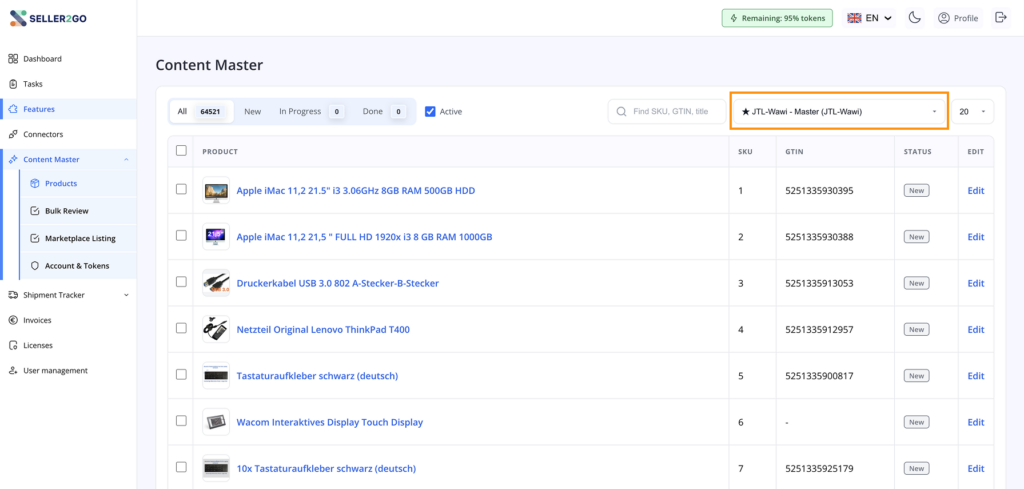
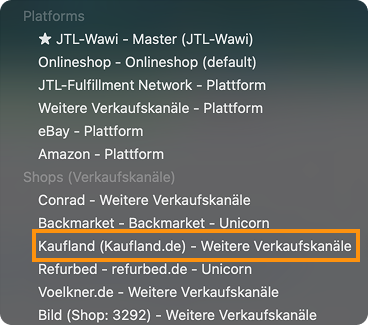
Open the platform selector and choose the marketplace you want to sell on. The list is grouped into Platforms (JTL-Wawi, Onlineshop, eBay, Amazon and more) and Shops (Verkaufskanäle) — your connected sales channels, for example Kaufland (Kaufland.de).
The product list reloads with the products of that channel. Tick Show all products if you also want to see products that aren’t listed on this channel yet.
Then open the product you want to prepare.

Generate listing fields
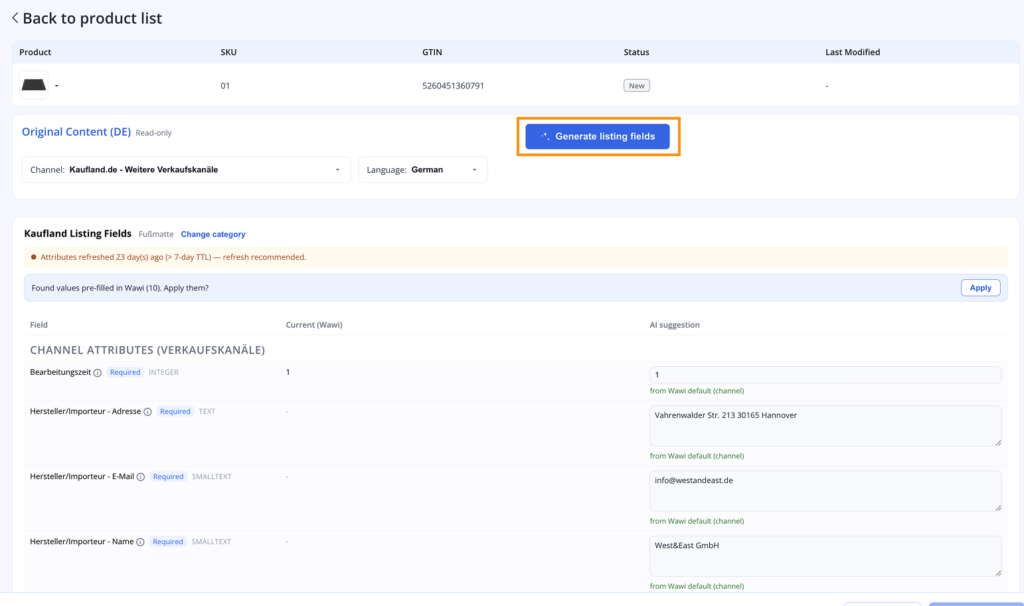
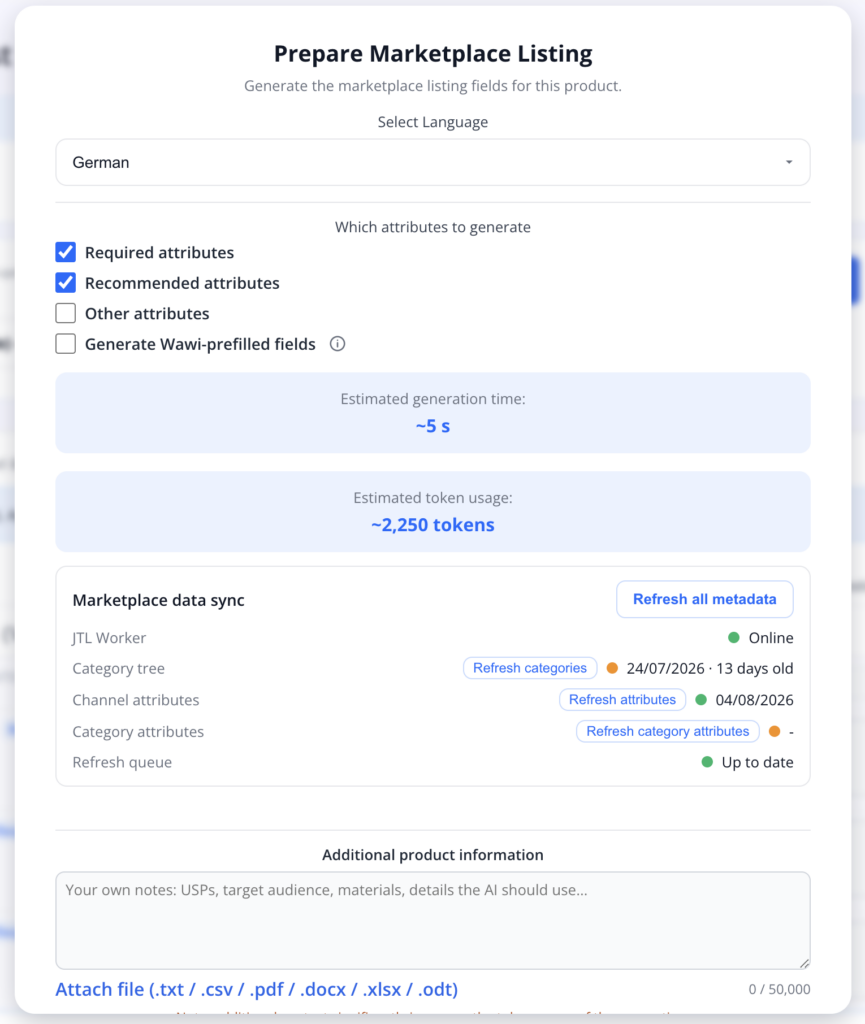
Click Generate listing fields. In Prepare Marketplace Listing you set up the run:
- Select Language — the language of the listing content
- Which attributes to generate:
- Required attributes — mandatory for the marketplace
- Recommended attributes — improve findability and ranking
- Other attributes — everything else the category offers
- Generate Wawi-prefilled fields — leave this off to keep the values that already come from your JTL-Wawi
Below you see the estimated generation time and the estimated token usage before anything starts — for example ~5 s and ~2,250 tokens.
Marketplace data sync shows how current the marketplace metadata is: the JTL Worker status, the age of the category tree, and the channel attributes. If something is out of date, refresh it with Refresh categories, Refresh attributes, or Refresh all metadata. A warning like Attributes refreshed 23 day(s) ago (> 7-day TTL) tells you a refresh is recommended.
Then click Generate Listing Fields.
Review attributes
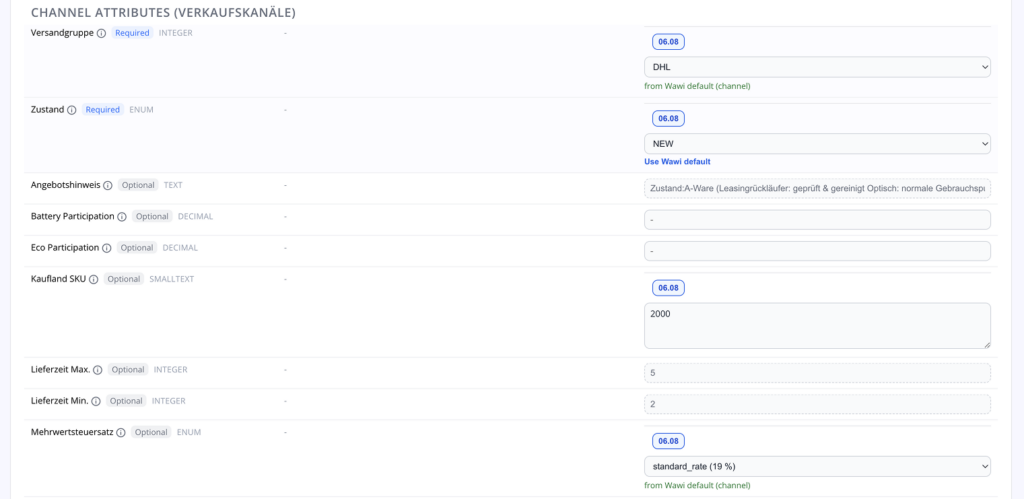
The result is organised in three columns: Field, Current (Wawi), and AI suggestion.
At the top you see the detected category — Kaufland Listing Fields · Fußmatte — with Change category if you need a different one.
Attributes are grouped into Channel attributes (Verkaufskanäle) and Category attributes. Each field shows whether it is Required or Optional and what type it expects (INTEGER, TEXT, ENUM, DECIMAL, BOOLEAN).
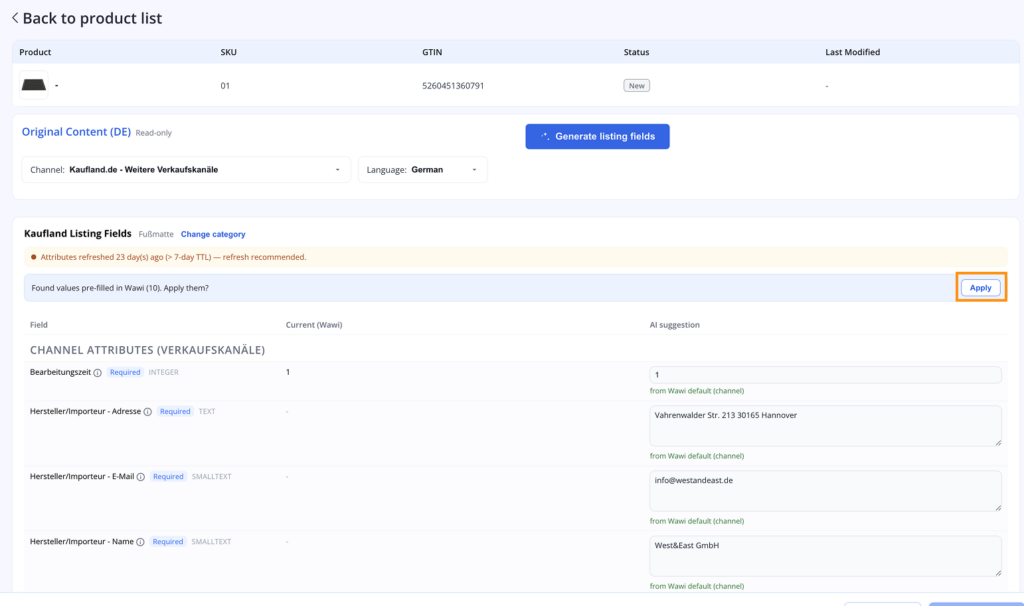
If Content Master finds values that already exist in your JTL-Wawi, a banner appears: Found values pre-filled in Wawi (10). Apply them? Click Apply to take them over. Those fields are then labelled from Wawi default (channel) or from Wawi default (category) in green — handling time, shipping group, VAT rate, manufacturer details. Where a Wawi default exists as an alternative, you’ll see Use Wawi default next to the field.
Go through the suggestions, adjust anything you want, and use the version chips under a field to switch between saved versions.
Apply to Wawi
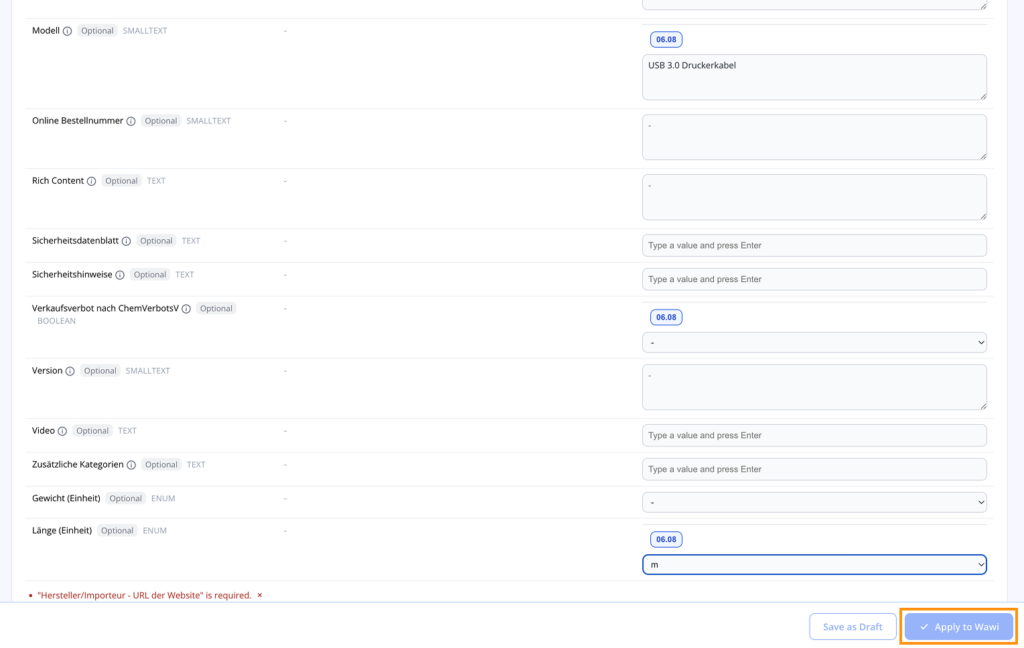
Click Apply to Wawi to write the listing attributes back to JTL-Wawi.
If a mandatory attribute is still empty, Content Master tells you before publishing — for example „Hersteller/Importeur – URL der Website“ is required. Fill the field in and apply again. This way an incomplete listing never reaches the marketplace.
Not ready yet? Save as Draft keeps everything, and the product waits in In Progress.